Storefront Themes “Original” theme: setting up your slider
People can find all of the options for setting up the slider in this premium theme quite confusing.
So let’s run through them all in detail.
First where do you look for all of these options? Well the main zone is the Storefront Options panel. Here it is below with the relevant Homepage Featured Tab open.

Select Storefront on the dashboard menu down the left side of your screen, then Homepage Featured
Throughout this post, in fact this blog I will refer to the long vertical menu down the left side of the WordPress backend as dashboard menu. So dashboard menu/Posts/Add New would refer to the “Posts” menu sub menu item “Add New”. This method of referring to menu/sub menu/setting will apply to all interface areas.
So quite a few drop down lists a couple of text fields and an upload button for good measure. yes you can set this up a few different ways, and then some. Let’s break it down into the four basic options.
OPTION 1.
This will give you the popular look of an image and text with a link button for more info. The link leads to a full Blog Post.
1. Go to Storefront theme options, Homepage Featured tab as in the image above.
2. At the top set “Featured Display Options” to “Show Blog Posts” the effect will always be scrolling.
3. Click “Save All Changes”
How do you get posts setup nicely for this you ask, read on.
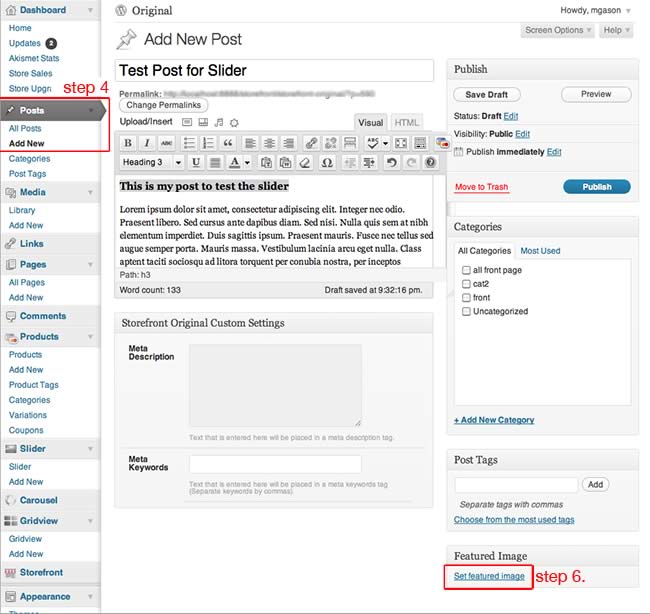
4. Go to dashboard menu/Posts Add new
5. Add some text normally.
6. Low on the right click “set featured image”
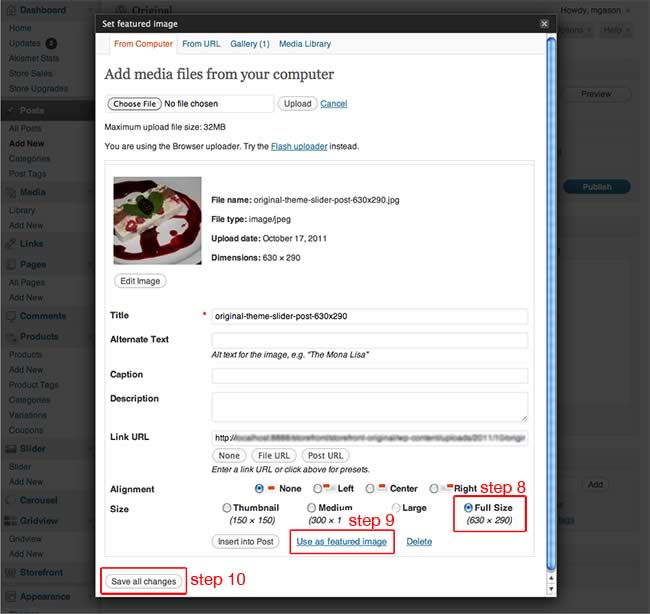
7. Upload a file from your computer via the media dialog box, or select one you already have uploaded for a product. A good size to sit in the slider window with a nice border that matches the text layout is 630 x 290. Larger images will be cropped.
8. Leave “full size” checked”
9. Click “use as featured image”
10. Click “Save All Changes”
11. Close the media dialog box
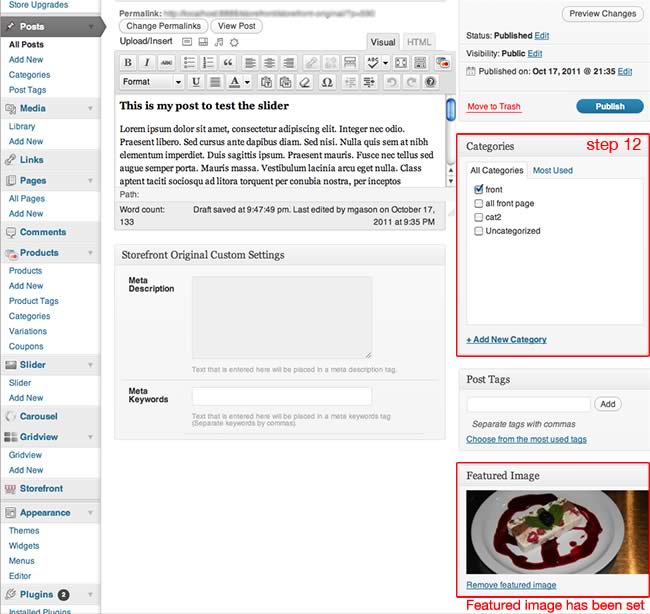
12. Assign the post to a category
13. Click publish
Now your posts will appear in the slider window
Additional settings
1. “Blog category” you may choose an individual blog category to pull the slider posts from
2. “Number of Blog Posts” the number of posts to appear in the slider. If you want to show more than 10 you will have to go to dashboard menu/Settings/Reading “Blog pages show at most” and raise the number. This number limits how many can show.
If you want to change the order of the posts at any point, select one, click quick edit and change the date/time of the post. They are ordered by publish time. This will of course change its post location on your blog.

The result, a post in the Slider
OPTION 2.
When you set Storefront Options/Homepage Featured tab “Featured Display Options” to Use Slider Post Type (either effect) it uses the custom post type “Slider” which you create in the Dashboard menu/Slider page.
These are the steps to do that
First
1. Go to Storefront theme options
2. Homepage Featured tab
3. At the top set “Featured Display Options” to “Use Slider Post Type” (either effect)
4. Click “Save All Changes”
Then
1. Go to Slider on the dashboard menu
2. Add new
3. Give it a name
4. Give it a URL for a link if desired
5. On the right click “set featured image”
6. Upload a file via the media dialog box, or select one you already have uploaded for a product. The size should be 920×290 to fill the Slider window. Your image will be cropped if it is bigger so just make it the right size and maintain total control.
7. Leave “full size” checked” and Click “use as featured image”
8. Click “save all changes”
9. Close the media dialog box
10. Click publish
repeat for each slide.
These will appear in your slider.
See option 1 screenshots to locate steps 5 through 12, they will appear the same

If you have more than 10 you will have to go to Settings/Reading “Blog pages show at most” and raise the number. Slider images are a custom post type, this number limits how many can show.
If you want to change the order of the images at any point, select one, click quick edit and change the date/time of the post. They are ordered by publish time.
OPTION 3.
This gives you one static image in the slider area. You could just have one custom slider post, BUT this way the slider javascript will not run and will make for less browser load. It is pretty obvious to set up.
1. Go to Storefront theme options
2. Homepage Featured tab
3. At the top set “Featured Display Options” to “Use Static Image”.
4. Below that click “upload an image” or enter image URL in the text field. 920×290 to fill slider window, larger will be cropped
5. If you clicked upload just select from your computer and click open
6. No media box involved just click “Save All Changes”
OPTION 4.
write your own HTML and put whatever you want in the slider area.
1. Go to Storefront theme options
2. Homepage Featured tab
3. At the top set “Featured Display Options” to “Use Custom HTML”
4. Enter your own HTML in the custom HTML box
5. Click “Save All Changes”
